 I’ve been making a lot of macarons lately, and when I’m completely happy with the process, I’ll put a post up. But in the meantime I’ve come to realise that whilst a perfect macaron shell is lovely, actually what the majority of people remember are the fillings. Macarons are vehicles for flavour, and I guarantee most people won’t know if your ‘feet’ have separated, or your shells are hollow. What they will remember is the texture!
So far I’ve played with freshly made jam (meh), buttercream (meh – too buttery), Italian meringue buttercream (still a bit buttery) and agar gels (lots of potential here).
But then I stumbled across a recipe by Karen Scott on the Australian thermomix forum for Italian meringue buttercream, and I had to give it a go. The idea that you can get on with making your macaron whilst the Thermo is making the filling is just too tempting!
I followed the recipe exactly as it stated, and oh my word! I’m really not a buttercream icing kind of girl, it’s always a bit to rich in my experience – but this is absolutely exceptional. Perhaps I should elaborate? It’s still incredibly buttery and creamy, but the quality of the meringue lifts it beyond anything I’ve seen made at home before. I’m not a massive cake eater, but when I’ve had them forced on me the overwhelming taste of the icing is either icing sugar, or butter (or worse still, both). In this there is an instant melt-in-the-mouth affect, with no one thing dominating – this allows the actual flavour to completely sing! I made passionfruit puree, then salted caramel – they taste nothing like each other – each tastes of its own component. This makes a large batch of this the perfect vehicle for flavouring several batches of macarons or cupcakes.
The meringue produced by the Thermo was way beyond my expectations, and I’m seriously considering using it to make macaron… In the meantime, I will never make buttercream any other way! Clearly you need a Thermomix to make the magic happen, but if you do have one – you just have to try this!
Ingredients
Swiss Meringue Buttercream
100 g egg whites
200 g Sugar (white or raw)
300 g unsalted butter cubed
Preparation
- Place egg whites and sugar into the TM Bowl. Mix for 5 minutes at 70c Speed 2.
- Check that all the sugar has dissolved by rubbing a bit between your fingertips. You should not be able to feel any sugar crystals. if you can, beat for 2-3 more minutes and check again.
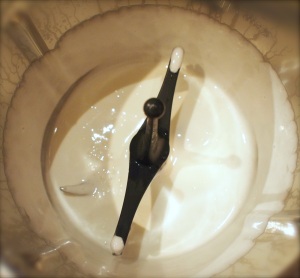
- Place the butterfly into the bowl and mix for 10 minutes at speed 4. At this stage the mixture should be smooth and glossy and form stiff peaks.
- If the mix has not yet cooled to room temperature, keep beating until the bowl is no longer warm to touch. This could take another 10-20 minutes. If you are short on time, transfer the mix to a stainless steel or glass bowl and sit in a basin of cold water. Once the bowl is cool to touch, tranfer the mix back to your TM bowl and continue.
- Mix for 3-4 minutes at speed 4, slowly adding the butter bit by bit through the lid. Don’t worry if it looks a little curdly along the way, it should all come back together.
- At this stage you can add colour or flavour of your choice. Suggestions are; vanilla extract (1 tsp), chocolate (100g melted and cooled), orange oil, lemon oil etc. I split my bacth in half and added chocolate to one half.
- Pipe or spread onto your cake or cupcakes and enjoy. You can put it in the fridge if you are not going to use it straight away but bring it back to room temperature and whip it again before using.
- You can increase the quantities to whatever you need, just keep the egg whites, sugar and butter in the ratio of 1:2:3. An 8 inch cake will take about 150g egg whites depending on the type of piping you use.
 |
| This is the first stage of the meringue, you can see the dense meringue consistency |
 |
| Following the addition of the butter, the meringue icing is a much richer colour and density |
I’ve now made several batches of this and it really is the best icing. One thing I have noticed is that if you keep beating the meringue until it’s completely cold, it does seem to re-liquify slightly. I’d be tempted to remove the jug and the lid to speed up the cooling process, but without over-whipping. I’ve also now made this with equal quantities of the buttercream and melted chocolate, and it’s ridiculously good. The kids have been flavouring it with all kinds of flavourings – great fun!